
Within 30-minutes of my elective Emergency Medicine rotation I was reading an Xray. I had no idea what I was looking at, but I was reading it none the less. There was just so much on the screen! Where do I start? Do I look at the top or bottom? How about that weird bone that looks more curved on the right, wait, is that even the patient’s right? I was just plain lost. There had to be some system in place for reading these suckers which I somehow never learned.
Our school prepares its students excellently well in terms of book knowledge, however, practical clinical abilities we were lacking. We did one blood draw before we saw our first patient. Most of us had never heard a lung crackle or wheeze before. And what was hampering me in this case was we were only given a one-hour X-ray interpretation lecture that involved CT, MRI, and X-rays. One hour! Three incredibly complex imaging modalities were given 20 minutes a pop. My 60 hours of training in the Kreb cycle and its intermediates were not really helping me at this time in my life. Mind blown.
So here I present to you what my attending taught me in 5-minutes flat. It has stuck with me since and I run this process every. single. time. I see a chest X-ray. Now let’s do this!
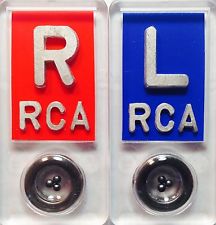
Get to know the symbols in the corner: (R) is patient right and (L) is left. The 3 letters are the x-ray technicians initials (so you know who to blame a bad image on). A circle with dots inside is an orientation marker which works using gravity. If the patient stands up the beads roll to the bottom of the “cup”. If they lay down the beads collect in the middle of the cup. Simple.
Pull up a comparison film: Everything in medicine is about comparison. Countless times I see some F’d up looking X-ray only to find out it’s the patient’s normal. Huge scoliosis, poorly healed rib fractures, asymmetrical to days end with opacities everything. It’s amazing what people live with. Of course the more recent a comparison the better. Get it on the screen and compare now!
The 4 “shuns” –
- Identification: Locate the patient’s name & date of birth. You would be surprised how many times I just assumed the correct x-ray was already in front of me only to be embarrassed and even yelled at once for presenting a “normal” finding of the incorrect person. Never again.
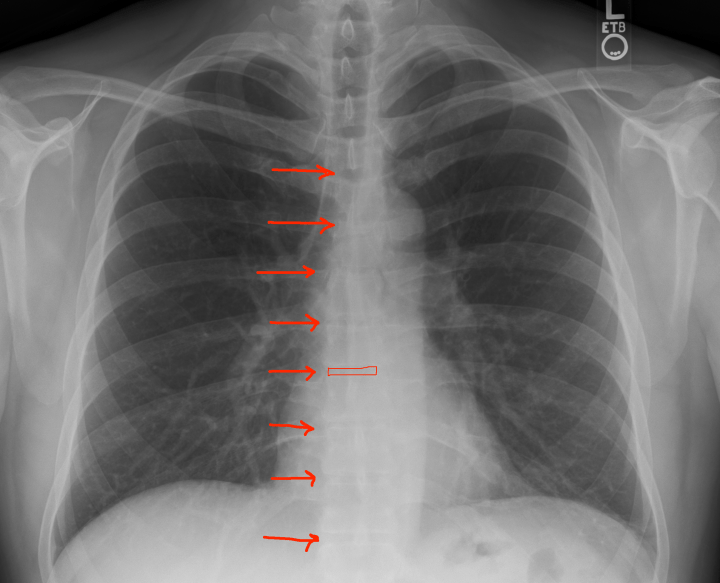
- Rotation: Look at the sternoclavicular joint (where you clavicle meets your breast bone). There should be equal spacing when comparing the left and right. If one side has greater gapping, that patient is rotated to that side and is not truly perpendicular to the imager. While this doesn’t seem like a big deal a rotation will distort the view of the heart & mediastinum potentially leading to a false diagnosis of cardiomegaly and/or widened mediastinum. Not good. I would dictate this as “non-rotated or neutral rotation”.

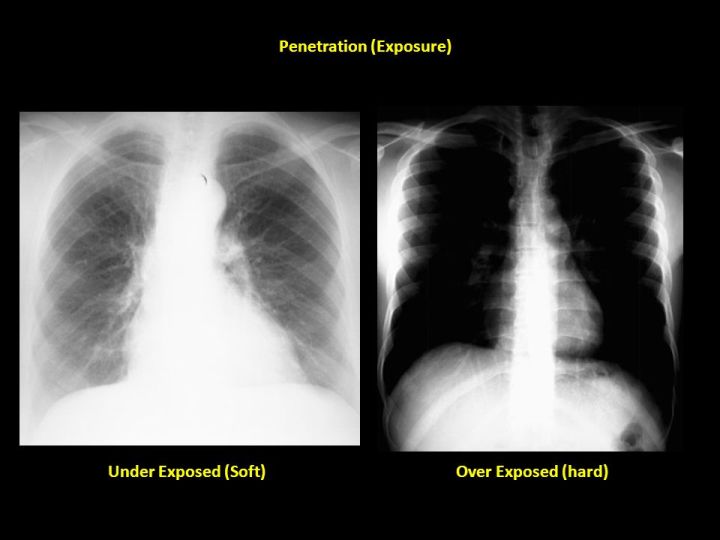
- Penetration: Is the image over or under exposed? Under means the image is too white (the radiation is not getting through adequately and more of the X-ray is appearing white or similar to bone than it should be), and over exposure is too dark. To tell which you have look for the intervertebral disks. Can you see them through the entire duration of the spine? You should need to squint a little in order to make each disk out but but they should NOT be crystal clear. I would dictate this as “appropriate penetration”.
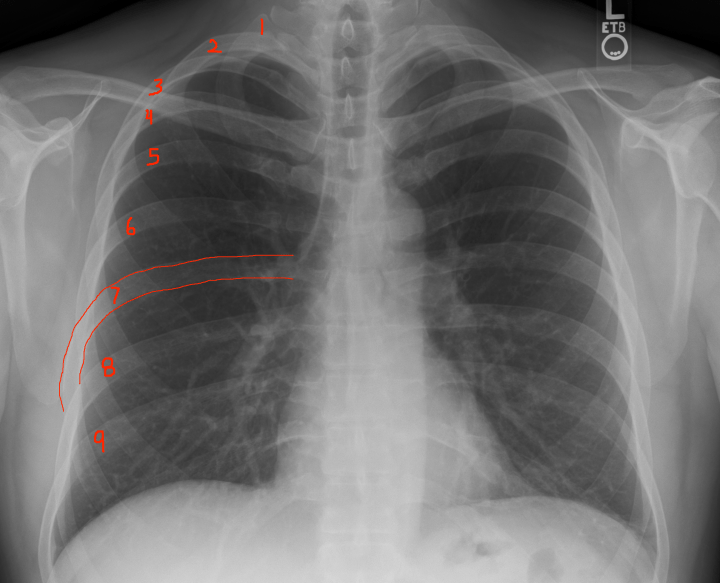
- Inspiration: Did the patient take an adequate breath? Count the ribs from top to bottom and see how many ribs you see before they dive under the diaphragm. >7 is the magic number. Less and you’re going to struggle to see enough of the chest cavity to make an accurate diagnosis. For some patients, elderly/frail/smokers, that’s all you’re going to get. Good luck. I would dictate this as “adequate/full inspiration”.
Read X-rays Out-to-In: Start as superficial & distal as possible (upper extremities) and progress towards the thorax (rib cage). Once there, switch to mnemonic ABCs.
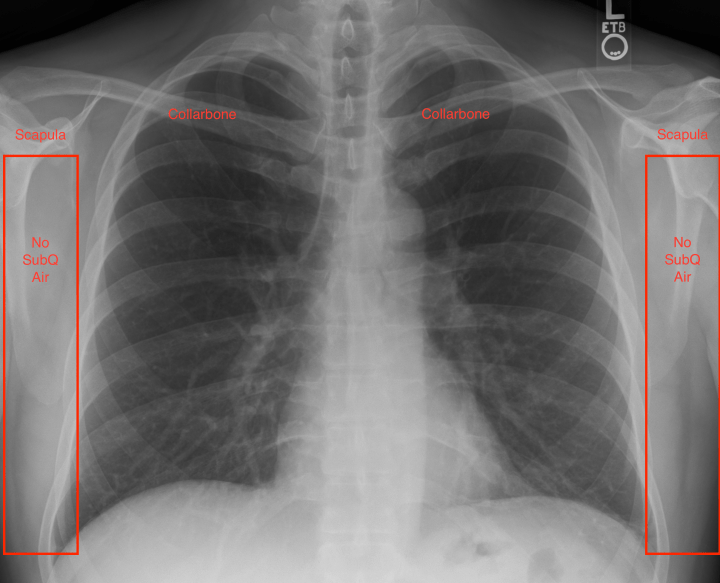
- Subcutaneous Air: While 99% of people might believe X-rays only demonstrate changes in boney structures, 100% of them would be wrong. A lot of information can be elucidated from the surrounding soft tissues. To begin, examine the soft tissues of the axilla & chest walls. ZERO air pockets or ‘bubbles’ should be seen. Any indication of such would imply air escaped from the thorax and a pneumothorax just jumped to the top of your differential.
- Peripheral Bones: Portions of both humerus, scapula and shoulder joints should be visible on CXRs. Additionally, both collarbones should be clearly seen. Take 2 seconds to compare them bilaterally to convince yourself you didn’t miss an embarrassingly obvious fracture or dislocated shoulder which could easily be masked by another more distressing patient complaint.
Finally, the ABC’s…
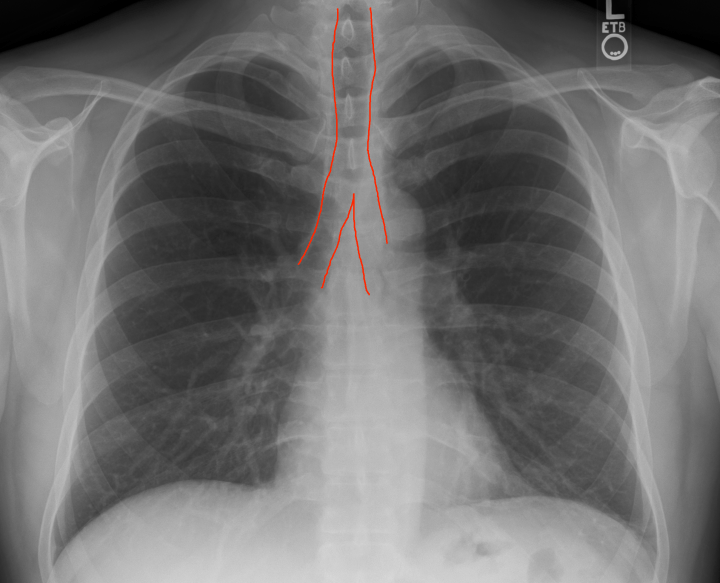
- Airway: Do you see a patent non-obstructed midline trachea & carina (bifurcation) separating into a left/right bronchi? I once missed a PENNY in a child. A large-ass oval metal object at the top of the screen since I was focused elsewhere. Don’t do that. Looking back is always 20/20 but if you run a system, any system, every time when analyzing X-ray films you won’t miss silly things like that. I would dictate this as “trachea, carina and bronchi visualized. no foreign bodies seen. patent airway”.
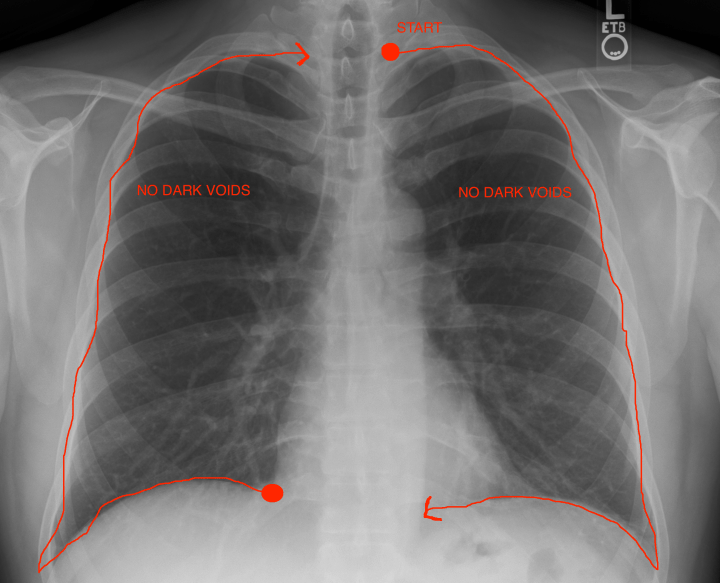
- Breathing: Do you see lung markings to the edge of the chest wall or does it look like a large black void where there is no tissue there? If so that’s a bad sign. Then trace the lunge pleura in an clockwise fashion to ensure the patient has no air between the lungs and chest wall indicating a pneumothorax. I would dictate this as “lung markings visualized to periphery. no evidence of pneumothorax”.
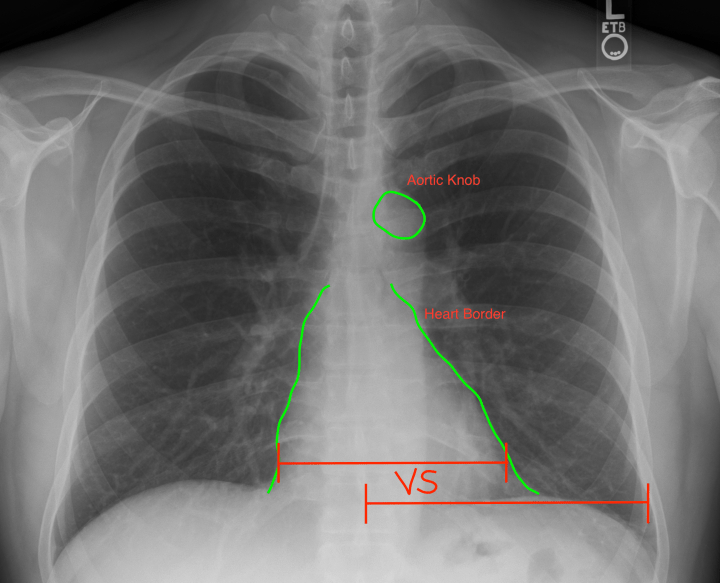
- Cardiac: the 3 C’s: The heart should take up <1/2 the width of the chest. Use your thumb & pointer finger to make a ghetto caliper and compare the heart at its widest point to the distance between the ribs & spinous process. If the heart’s width is greater, the patient presumptively has cardiomegaly. (It’s critical however that you’ve already determined that the patient was not rotated when the CXR was taken. Rotation will produce a falsely narrowed chest diameter AND falsely increased heart width, producing pseudocardiomegaly) Second, the heart should have a clear L & R border that is non obstructed by any lung markings. Patient’s with pneumonia or other lung diseases will have opacities making the border hard to discern. This is not just a “cardiac” check, but also lungs. Lastly, a clear aortic knob should be identifiable. I would dictate this as “heart of appropriate size. no evidence of cardiomegaly. aortic knob observed. clear right & left borders to the heart visualized”.
- (Update) I didn’t quite know where to put this (since this tutorial originally flowed so well) but one of my mentors thankfully stressed that the mediastinum needs special attention. It’s HUGE in the ED! Look directly at the center of your CXR and slightly off to the patient’s left-hand side. That’s where the thoracic aorta runs. If you’re going to diagnose a thoracic aortic dissection, this is where you’ll see one. (A dissection is simply where trauma/cut on the interior surface of a blood vessel allows blood to forcibly enter between 2 layers of tissue (where it shouldn’t be), physically tearing them apart by blood pressure alone. Now you can understand why patients classically describe dissections as a ‘tearing pain in my back’). Here’s two things you don’t want to see:
- Calcification: the vertically running thoracic aorta will literally be ‘outlined’ in white indicating significant atherosclerosis. Huge risk factor for a dissection.
- Apical Cap: Typically you do not see the aorta on a CXR. It’s just more soft tissue inside the chest cavity. However, once enough blood has dissected/pooled between its layers during a dissection the aorta becomes clearly visible ~left collarbone where it turns downward. BAD SIGN.
- Diaphragm: This is the easiest one. There should be a clear costal phrenic angle. Can you clearly see a sharp point at the lower L and R side of the image. If not then there is fluid trapped by gravity at these 2 lowest points in the chest cavity. Unfortunately you can not tell via X-ray what kinda of fluid it is (blood, pleural, serious, etc.) but at you least you know something is there. I would dictate this as “clear costal phrenic margins with no evidence of fluid collection”.

- Everything Else: Reading an X-ray means only one thing: you are responsible for literally everything on that screen. Patient comes in with simple pneumonia but their X-ray shows a gun shot induced tension pneumothorax and a baby alien inside. Well it’s on you to find that and make note of that buddy. Take the time after completing all these steps and look at the image in its entirety and ask “what am I missing”. Does something just look off? Are there rib fractures hiding at the lateral edges (as they always do)? Does the patient have an internal defibrillator or ECG leads everywhere? Do you see any weird double circles everywhere which makes you think they swallowed a bunch of coins because they are probably the buttons to their gowns. Etc. I would dictate this as “no evidence of acute fractures observed. no foreign bodies. normal chest x-ray. awaiting final interpretation and diction by radiologist”.
And that’s it! Practice makes perfect and second opinions never hurt, ESPECIALLY as a student. I’ll attach the original image below for you to practice your shuns & ABC’s on. Good luck!


One thought on “Reading Chest X-rays (Updated)”