
So I’ve been performing eye exams on and off for the past 4 months. First in a emergency room up north and now at an occupational health clinic. If anything, I’ve learned 2 things: (1) everyone does the examination differently but every step gets done. (2) You’re going to see a lot of eye injuries. Human’s eyes are just asking to be injured. They are wide open every second you’re awake and have zero tolerance. Something brushes against them, a speck of something gets stuck, etc. and if your body can’t simply cry it out, you’re in big trouble. So I’m going to break this down into 2 parts, the basic anatomy of the eye and the process of retrieving the foreign body.
Anatomy:
The eye anatomically has seemingly hundreds of labels. Thankfully for a simple, straight forward foreign body removal there’s only a few critical identifiers to remember.

- Sclera: The white of the eye.
- Pupil: The black hole at the center which allows light to enter, permitting vision.
- Iris: The ring of color encompassing the pupil.
- Tarsal Plate: The upper & lower eyelids.
- Conjunctiva: The superficial layer of both the eyeball itself and the inner surface eyelid which contacts the eye.
The Examination:
Disclaimer: This guide is to be used solely by licensed health care professionals (or those training directly under them) and expresses thoughts of myself only and is not a reflection of any institution or healthcare establishment.
To begin there are 2 things which absolutely must be done prior to touching the patient. (1) A full detailed history of the injury. Hopefully that’s obvious. You’re not going to be questioning someone while poking and prodding their eye. (2) A vision check. Every patient requires a visual acuity assessment of their injured eye, non-injured eye and both. Just like you’re at the DMV (have the patient recite the lowest line on a vision chart). You want your documentation to be crystal clear that your intervention didn’t somehow cause an acute lose of vision which would be a medical-legal nightmare.
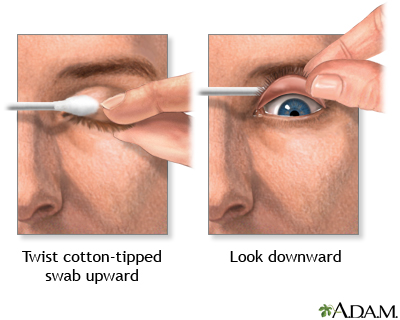
Next, start your assessment of the eye. Realize quickly that most patients are in a significant amount of pain and rightfully have low tolerance for any dilly-dallying. How does the affected eye compare to the non? Is the eye injected or red? The goal with your examination is to visualize all surfaces of the eyeball itself as well as the inside of both the upper and lower eyelids. Start by numbing the eye. In the event you locate the foreign body while examining the eye, you want to remove it quickly and not have to pause, apply an anesthetic while you wait and pray the particle hasn’t moved. Simply apply 2 drops of Tetracaine and wait 30 seconds before proceeding. For everything that follows, adequate lighting is key. Whether you have a lamp on wheels, otoscope or mountain climbing head lamb, make you have illuminate anywhere you want to see. Next, place your thumb and index finger directly above and below the eyelids and apply a separating force. Have the patient look in all 4 quadrants of the an imaginary box (top left, top right, bottom right, bottom left). Next look on the inside of the lower eyelid. With your thumb below lid, pull down to create a gap and visual this space. Next comes the tricky part, inverting the upper eyelid. I’m not going to lie, it’s difficult. The idea is simple though and have the patient relax. Any eyelid movement or resistance makes this go from difficult to impossible. Grab a Q-tip, place in on the center of the eyelid itself while your other hand’s index finger and thumb grabs the eye lashes and pulls directly away from the eye. Have the patient look down while you push the Q-tip down, inverting the eyelid. Don’t worry, this does not hurt the patient. Problem is this will not work unless you just go for it! I’m not saying rip their eyelashes off their face, but (1) the eyelashes aren’t going anywhere if you grab +10 (which is very easy to do) and (2) hesitancy = failure.
There are 2 types of foreign bodies you will encounter: (1) nonimpacted ones are simply adhered to eye. These can be easily removed by gently touching a sterile Q-tip to it and slowly roll. DO NOT PRESS HARD since you may drive the object into the eye, which brings us to the second type (2) impacted. These are more difficult to treat and I’m going going to cover the most basic type, small metal ones. Other, larger impacted objects, require an urgent ophthalmology consultation with the very real possibility of losing that eye. Smaller impactions however can either be extracted using a 18-gauge needle (yes you read that right) or a small rotating drill bit to grind out the piece. Instead of being annoying verbose with an walkthrough, I’ll provide a link. 🙂 Lastly, and I thought it was very ingenious when my preceptor did this, save the foreign body! He simply took scotch tape, touched the Q-tip with body on it and put taped it directly in his notes. So cool!
Finally, don’t be baffled if you perform a thoroughly examination of the eye without finding anything. As described to me the eye has an entire limbs worth of nerves on it so any scratch, fluid collections or literally anything unnatural to the surface of the eye or eyelid feels like a foreign body. Once the eye examination and foreign body have been successfully removed, the eye must carefully be examined for any abrasions. To do so, wet a paper fluorescein dye applicator with 1-2 drops of ophthalmic solution while you hold the eye open and applied (not perpendicularly to avoid scratching the eye) it to either the inside of the lower lid (conjunctiva) or the eye/sclera itself. Have the patient blink it in and then observe the eye under blue UV light (either a handheld unit or larger split-lamp machine) under complete darkness. Any corneal abrasion appears bright green and is impossible to miss.
You’re home free now! Wash the fluorescein dye out by providing the patient with +10 Kleenex while you hold their eye open and flood the eye from medially (nose) to laterally (ear) two times, ~5 seconds each. If the patient is at risk of an infection (via metal impaction since no metal is sterile), apply 2 drops of neomycin antibiotic eye drops & provide the patient with several refresh eye drops (lubricating solution) to take home and apply every couple hours simply for comfort before scheduling a follow up. ALL EYE FOLLOWUPS ARE IN 24 HOURS. You do not mess around with the eye. If something is going to get worse, it’s happens fast and you want to be there to reevaluate and intervene when it does. Lastly draw an picture in your notes & dictate the location of the object using an imaginary clock (example: foreign body visualized at the 1 o’clock position and removed via…). Perform a final visual acuity assessment and that’s it! Hopefully this guide was brief enough to read through quickly but thorough enough to cover most of the minute details.

One thought on “Simple Foreign Body Removal from the Eye”